Easy Small Woodworking Projects: 12 Weekend Ideas
Have you ever wanted to build something with your hands but didn’t know where to start? That’s where easy small woodworking projects come in. These simple builds help you learn core skills without investing in expensive tools or large amounts of lumber. Whether you’re a beginner looking for confidence or a weekend DIYer wanting quick wins, easy small woodworking projects offer a practical way to create useful pieces in just a few hours.
They matter because small builds remove the pressure of big commitments. You can try new cuts, finishes, and joinery techniques on a manageable scale. Many of these ideas use scrap wood you may already have, making them budget-friendly as well. As you complete more easy small woodworking projects, you gain experience that opens the door to larger furniture builds later on.
In the next sections, we’ll walk through beginner-friendly ideas, helpful tips, and simple plans to get you started.
Chapter 1: What Makes Easy Small Woodworking Projects Truly Beginner-Friendly?
Starting with easy small woodworking projects is one of the simplest ways to learn the basics of DIY without feeling overwhelmed. These projects are intentionally designed to be approachable, require minimal tools, and offer quick, confidence-building results. As you work through more easy small woodworking projects, you start to understand how wood behaves, what tools you enjoy using, and how your personal style develops.
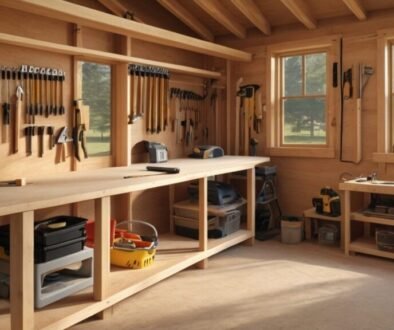
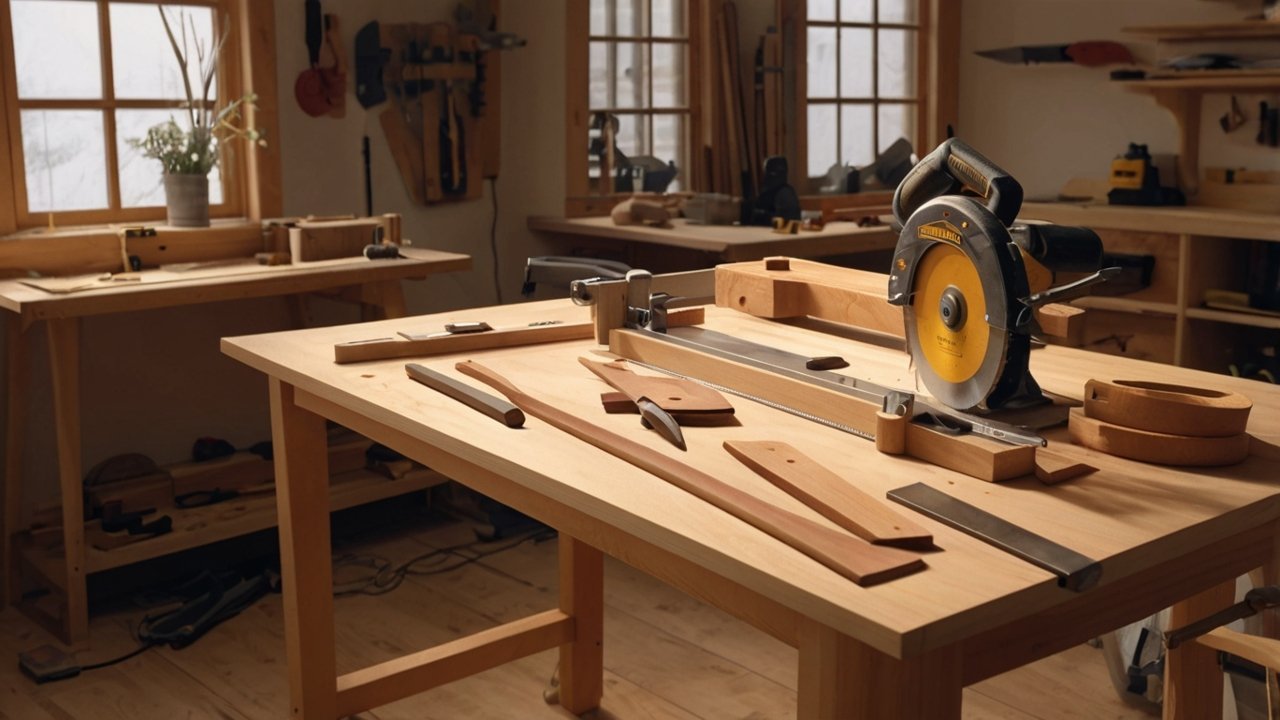
Basic Tools Most Beginners Already Have for Easy Small Woodworking Projects
One reason small projects are so accessible is that they rarely require specialty tools. Beginners can get started with only a few essentials such as a drill, hand saw, clamps, sandpaper, and wood glue.
If you’re setting up your workspace, this guide is a great starting point:
👉 Beginner-Friendly Woodworking Shop Setup
Want a complete starter tool kit?
👉 Click here to explore this recommended DIY solution
Choosing the Right Wood for Beginner Projects
Wood selection can make or break your early experience. Softwoods like pine are cheaper, easier to cut, and ideal for small projects. Hardwoods offer a premium look but require sharper tools.
Learn more about wood types here:
👉 Complete Guide to Choosing the Right Wood
Planning bigger builds someday?
👉 See how you can build your own shed with this step-by-step guide
Safety Tips Every Beginner Should Know
Even small woodworking projects deserve proper safety. Wear glasses, secure your wood, and take your time.
If you’re learning joinery basics safely, check:
👉 10 Must-Know Wood Joinery Techniques
Why Easy Small Woodworking Projects Matter
Small wins create momentum. A simple phone stand or set of coasters offers:
Pros
-
Low cost
-
Low risk
-
Fast results
-
Builds core skills
Cons
-
Limited size
-
Fewer advanced techniques
Ready to expand your project collection?
👉 Check out these affordable woodworking plans →
Better Results With Good Finishing Habits
Finishing transforms a raw project into something polished and durable.
Learn how to finish wood like a pro:
👉 Top Wood Finishing Techniques
Chapter 2: Simple Wooden Coasters
Why Simple Wooden Coasters Are One of the Best Easy Small Woodworking Projects
Simple wooden coasters are often the first build many beginners try, and for good reason. They’re small, forgiving, and deliver instant gratification. Because coasters require minimal measurements and only a few cuts, they’re perfect for learning basic skills like sanding, edging, and applying finishes. Even better, most people already have enough scrap wood to create several sets without spending extra money.
If you’re looking for additional beginner ideas, check out:
👉 10 Easy Builds for Beginners
Materials and Tools You’ll Need
You can keep it simple with common softwoods like pine or poplar. Hardwoods like walnut or oak give a more premium look, but they’ll require sharper blades and a bit more sanding.
Typical tool list:
-
Measuring tape
-
Small hand saw or circular saw
-
Sandpaper (120, 220, 320 grit)
-
Wood glue (optional for decorative patterns)
-
Clamps
-
Finish: oil, wax, or polyurethane
If you’re still building your tool collection, here’s a resource to guide your setup:
👉 Beginner-Friendly Woodworking Shop Setup
Want an affordable all-in-one beginner workshop?
👉 Click here to explore this recommended DIY solution
Step-by-Step: How to Build Simple Wooden Coasters
Step 1: Choose and Prepare the Wood
Select wood at least 3.5–4 inches wide. Make sure to remove any rough edges or damaged areas. For guidance on choosing the right species, see:
👉 Complete Guide to Choosing the Right Wood
Step 2: Cut the Wood Into Squares or Circles
Straight cuts are easiest, but circular coasters can be made with a jigsaw. Don’t worry about perfection—the sanding stage will smooth minor imperfections.
Step 3: Sand Thoroughly
Start with 120 grit to smooth the surface, then move up to 220 and 320 grit. Smooth edges are key for coasters because they’re frequently handled.
Step 4: Apply Your Finish
Finishes like tung oil, mineral oil, or polyurethane protect the wood from moisture rings and heat. For advanced finishing methods, visit:
👉 Top Wood Finishing Techniques
Looking for a deeper dive into wood-friendly finishes?
👉 Best Polyurethane Types and How to Apply Them
Design Ideas to Personalize Your Wooden Coasters
Wooden coasters may be simple, but they offer endless customization opportunities:
-
Burn a monogram using a wood-burning pen
-
Apply geometric patterns using painter’s tape
-
Create two-tone laminations with contrasting woods
-
Add a cork or felt backing for scratch protection
These little touches turn a basic beginner project into a thoughtful handmade gift.
Want more décor-style woodworking ideas?
👉 DIY Wood Decor: 15 Ideas to Upgrade Any Room
Pros and Cons of Making Your Own Wooden Coasters
Pros
-
Budget-friendly
-
Beginner-friendly
-
Great scrap-wood project
-
Easy to personalize
Cons
-
Requires basic tools
-
Finishing can take extra drying time
If you’re interested in more small-project inspiration, try:
👉 Beginner Woodworking Projects: 10 Easy Builds to Try
Or explore a large library of fully illustrated plans:
👉 Check out these affordable woodworking plans →
When to Upgrade Your Skills
Once you’ve mastered coasters, you’ll have the foundational skills for more advanced small woodworking builds like shelves, trays, and phone stands. If you’d like structured guidance for progressing from beginner to intermediate projects, here’s a helpful premium resource:
👉 Click here to explore this best solution for DIY builders

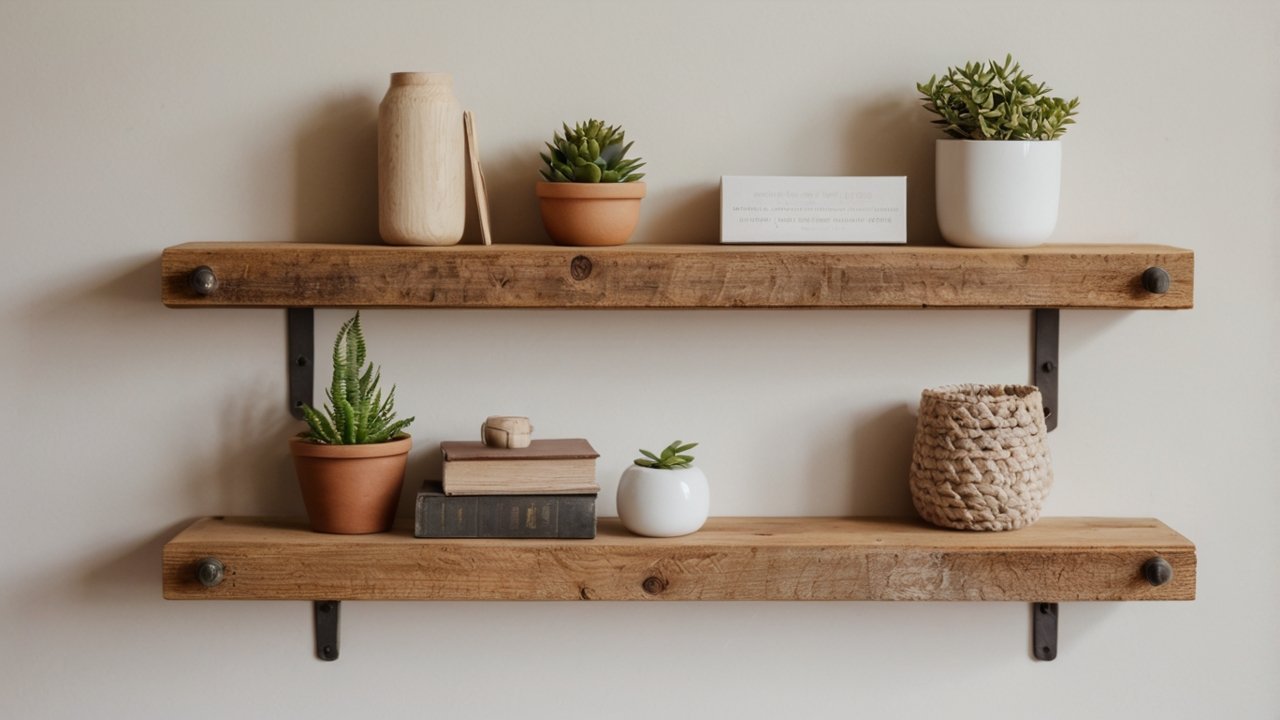
Chapter 3: Rustic Wall Shelves
Why Rustic Wall Shelves Are Ideal Easy Small Woodworking Projects
Rustic wall shelves sit right at the intersection of simple construction and big visual impact. They’re one of the most rewarding easy small woodworking projects because they help beginners practice clean cuts, accurate measuring, and basic mounting techniques. Even with just a few straight boards, you can create a practical shelf that instantly upgrades any room.
If you want more ideas for beginner-friendly builds, here’s a helpful resource:
👉 10 Easy Woodworking Projects for Beginners
Materials and Tools You’ll Need
Rustic shelves typically use pine, cedar, or reclaimed boards. Their slightly imperfect textures add charm and minimize pressure on beginners who worry about flawless finishes.
Common tools for this project include:
-
Measuring tape
-
Saw (hand saw or circular saw)
-
Drill/driver
-
Screws & wall anchors
-
Sandpaper (120–220 grit)
-
Wood stain or finish
If you’re still learning which wood to choose for each project, this guide helps:
👉 Complete Guide to Choosing the Right Wood
Want a budget-friendly way to set up a home workshop?
👉 Click here to explore this recommended DIY solution
How to Build Rustic Wall Shelves (Beginner-Friendly Steps)
Step 1: Cut the Boards to Length
A standard rustic shelf ranges from 18 to 36 inches long. Straight cuts are all you need—perfect for beginners practicing accuracy.
Step 2: Sand for a Smooth yet Rustic Look
Start with 120 grit and lightly sand to remove splinters. Don’t over-sand if you want to keep the rustic texture.
Step 3: Add Your Finish
Shelves look great with stains like walnut, oak, or even weathered gray. For deeper finishing tips, check:
👉 Top Wood Finishing Techniques
If you prefer durable clear finishes, here’s a dedicated breakdown of polyurethane:
👉 Best Polyurethane Types and Application Tips
Step 4: Install Mounting Hardware
Rustic shelves can be mounted using:
-
L-brackets
-
Hidden floating shelf brackets
-
Screw-through mounts
If you’re unfamiliar with working securely with anchors and wall types, the guide below helps elevate your woodworking skill set:
👉 10 Must-Know Joinery Techniques
Step 5: Mount the Shelf on the Wall
Measure twice, drill once. A simple level makes the final installation look much more professional.
Design Variations for Rustic Wall Shelves
Rustic shelves are highly customizable and fit virtually any interior style. Try one of these styles:
-
Farmhouse look: Distressed whitewash finish
-
Industrial look: Black metal brackets
-
Minimalist floating shelf: Hidden hardware + natural wood stain
-
Reclaimed vintage style: Use reused fence boards or pallet wood
Want to explore more decorative woodworking ideas?
👉 15 DIY Wood Décor Ideas to Upgrade Any Room
Pros and Cons of Building Rustic Wall Shelves
Pros
-
Highly functional storage
-
Uses inexpensive lumber
-
Works with almost any home décor
-
Great first step toward larger projects like bookcases
Cons
-
Requires accurate wall mounting
-
Some finishes need drying time
-
Anchors differ based on wall type (drywall vs. brick)
If you’d like structured plans for more wall-mounted builds, here’s a helpful resource:
👉 Check out these affordable woodworking plans →
When You Should Upgrade to More Advanced Projects
Once rustic shelves feel easy, you’re ready for builds that require stronger joinery or longer boards—like console tables or storage benches. If you dream of expanding to tiny home building or full interior wood design, this guide is an excellent next step:
👉 See this best solution for DIY builders
Chapter 4: Entryway Key Holder
Why Entryway Key Holders Are Perfect Easy Small Woodworking Projects
An entryway key holder is one of the most practical and satisfying easy small woodworking projects you can build as a beginner. It solves an everyday problem—lost keys—while giving you a compact project that teaches measuring, drilling, and simple layout design. Best of all, key holders are small enough to craft entirely from scrap wood, making them both budget-friendly and beginner-approved.
If you want more ideas like this, explore:
👉 Beginner Woodworking Projects: 10 Easy Builds to Try
Materials and Tools You’ll Need
Most entryway key holders require only basic tools:
-
Scrap wood board (6–12 inches wide)
-
Hooks or pegs
-
Drill and drill bits
-
Sandpaper
-
Screws for wall mounting
-
Optional: magnetic strip, shelf lip, or decorative elements
If you’re still organizing your tool setup, here’s a guide to streamline your workspace:
👉 Beginner-Friendly Woodworking Shop Layouts & Essential Tools
Looking for an affordable way to upgrade your tool collection?
👉 Click here to explore this recommended DIY solution
How to Build a Simple Entryway Key Holder
Step 1: Cut and Prep Your Board
Choose a board between 3/4″ and 1″ thick. A width of 4–6 inches works well. Sand the edges to remove splinters.
Step 2: Mark Your Hook Placement
Even spacing makes the design look intentional. Beginners usually place hooks 1.5–2 inches apart.
Step 3: Drill Pilot Holes
Pilot holes prevent wood from splitting and help your hooks screw in smoothly—an easy but essential woodworking skill.
If you’re learning more precise drilling or joinery techniques, this guide helps:
👉 10 Must-Know Wood Joinery Techniques
Step 4: Add Finish or Paint
A simple coat of stain, polyurethane, or wax can make your project feel polished.
Learn finishing basics here:
👉 Top Wood Finishing Techniques
Prefer paint instead of stain?
👉 Best Paint for Wood Furniture: Top Picks for 2025
Step 5: Mount It on the Wall
Use drywall anchors or screws based on your wall type. Make sure it’s mounted near your door for easy access.
Want to go even further and build complete wall organization systems?
👉 Check out these affordable woodworking plans →
Creative Key Holder Variations for Beginners
One of the best parts of making your own entryway key holder is the chance to customize it. Here are some easy variations:
-
Magnetic strip key rack – Insert a hidden magnet behind the wood.
-
Mini shelf combo – Add a small 3-inch ledge for wallets or sunglasses.
-
Rustic hook board – Use reclaimed wood for a raw, farmhouse look.
-
Personalized engraving – Add initials or house numbers with a wood-burning pen.
If you enjoy wood décor projects, here’s more inspiration:
👉 DIY Wood Decor: 15 Ideas to Instantly Upgrade Any Room
Pros and Cons of Building Your Own Key Holder
Pros
-
Very quick project—often under 30 minutes
-
Ideal way to use scrap wood
-
Beginner-friendly drilling practice
-
Helps organize your entryway instantly
Cons
-
Requires accurate mounting height
-
Hooks may loosen if not drilled properly
-
Small size means limited storage unless you add a shelf
If you’d like to improve your cutting accuracy for small builds, explore:
👉 Woodworking Planers & How They Work
When to Upgrade to More Advanced Entryway Projects
Once you’ve built a few key holders, you might feel ready for more functional entryway builds like shoe racks, mail organizers, or wall-mounted shelves. If you’re thinking about scaling up your DIY skills, this comprehensive course is an excellent next step:
👉 See this best solution for DIY builders
You can also explore larger outdoor projects—from planters to sheds—using premium plans like:
👉 See how you can build your own shed with this step-by-step guide

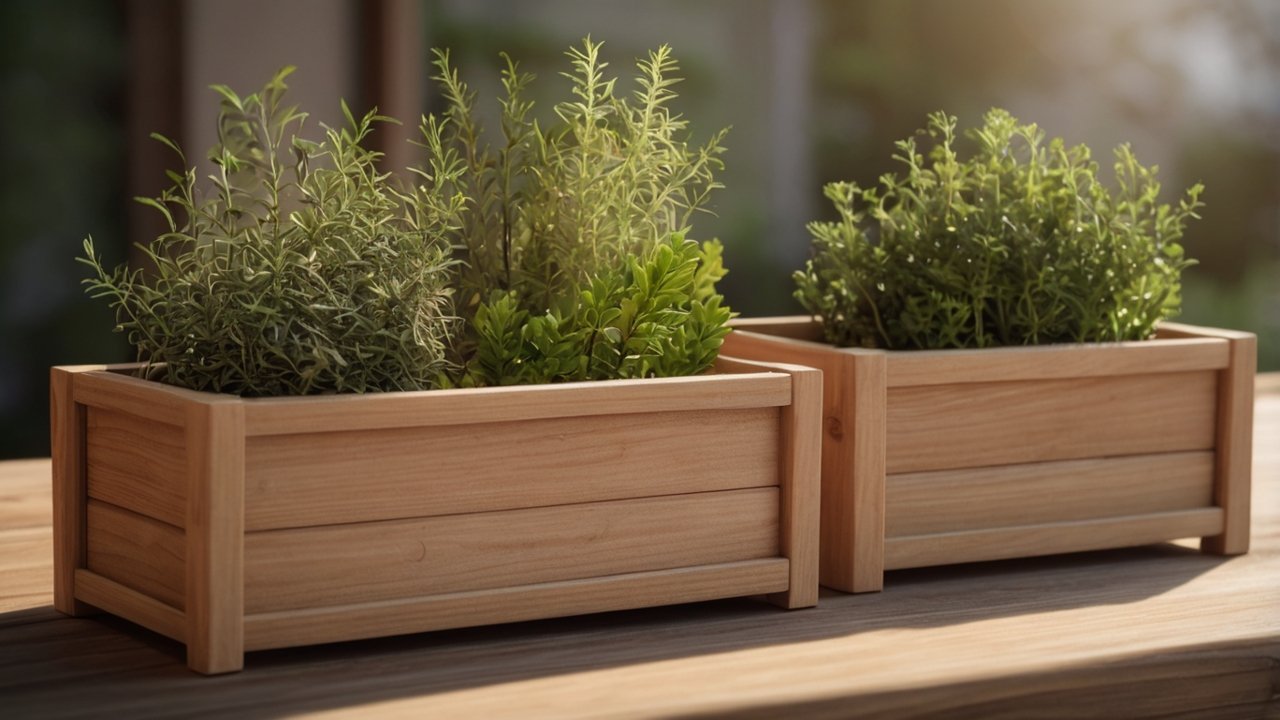
Chapter 5: Small Planter Boxes
Why Small Planter Boxes Are Among the Easiest Small Woodworking Projects
Small planter boxes are one of the most enjoyable easy small woodworking projects because they’re quick to build, look great in any space, and offer endless customization possibilities. Whether you’re growing herbs in the kitchen, succulents on a desk, or small flowers on a balcony, planter boxes help you practice safe cutting, assembly, and finishing while giving you something beautiful and functional.
They’re also an excellent way to use up short offcuts of cedar, pine, or redwood—woods that naturally resist moisture and work well outdoors.
If you want more simple DIY ideas for beginners, here’s a helpful list:
👉 10 Easy Woodworking Projects for Beginners
Materials and Tools You’ll Need for Small Planter Boxes
Planter boxes require only basic materials and tools, which makes them perfect for weekend builders.
Recommended wood types:
-
Cedar (best for outdoor use)
-
Pine (budget-friendly for indoor planters)
-
Redwood (moisture-resistant)
Learn more about wood selection here:
👉 Complete Guide to Choosing the Right Wood
Basic tools needed:
-
Saw (hand saw, jigsaw, or circular saw)
-
Drill and screws
-
Sandpaper (120–220 grit)
-
Wood glue (optional for added strength)
-
Finish: outdoor sealant, polyurethane, or paint
Still building out your workshop tools?
👉 Click here to explore this recommended DIY solution
How to Build a Small Planter Box (Beginner-Friendly Steps)
Step 1: Cut Your Boards to Size
A basic planter box uses four side panels and a bottom piece. For example, a 6″ x 6″ cube is ideal for herbs and succulents. Straight cuts make this a comfort-zone project for new woodworkers.
Step 2: Pre-Drill Screw Holes
Pre-drilling prevents splitting, especially with softwoods like pine. Assembly becomes faster and cleaner—an important habit for all future woodworking builds.
Want to improve your joinery basics before tackling larger projects?
👉 10 Must-Know Wood Joinery Techniques
Step 3: Assemble the Box
Attach the sides using screws or brad nails. Add the bottom panel inside or flush-mounted depending on your design preference. A small bead of glue along the joints can add extra rigidity.
Step 4: Sand and Finish
Sand edges to soften corners and prevent splinters. For outdoor planters, choose a weather-resistant finish. For indoor use, natural oils or polyurethane work well.
Learn how to apply finishes like a pro here:
👉 Top Wood Finishing Techniques
If you prefer paint for a decorative look, see:
👉 Best Paint for Wood Furniture (2025 Edition)
Design Ideas for Small Planter Boxes
Planter boxes offer a fun way to try different styles and finishes without using much material. Here are several beginner-friendly design variations:
-
Rustic slat-style box using thin scrap wood
-
Modern minimalist cube with clean lines and matte black paint
-
Herb trio planter with dividers for multiple plants
-
Floating window planter mounted with brackets
-
Two-tone designs using contrasting stains
Want even more décor-oriented woodworking inspiration?
👉 DIY Wood Décor: 15 Ideas to Instantly Upgrade Any Room
Pros and Cons of Building Your Own Planter Boxes
Pros
-
Extremely beginner-friendly
-
Great use of inexpensive or scrap wood
-
Works indoors and outdoors
-
Helps develop essential assembly skills
-
Highly customizable
Cons
-
Outdoor planters must be sealed properly
-
Soil moisture can shorten lifespan if finish is poor
-
Requires accurate measuring to avoid gaps
Interested in creating larger outdoor woodworking projects like benches, garden planters, or even decks?
👉 Check out these affordable woodworking plans →
When to Expand Into Bigger Gardening or Outdoor Projects
Once you’ve mastered planter boxes, you’re ready to try raised garden beds, outdoor tables, and patio storage units. If you’re considering building backyard structures or upgrading your outdoor space, this blueprint collection is a great next step:
👉 See how you can build your own shed with this step-by-step guide
And if you dream of establishing a fully functional small home or micro-living space:
👉 See this best solution for DIY builders
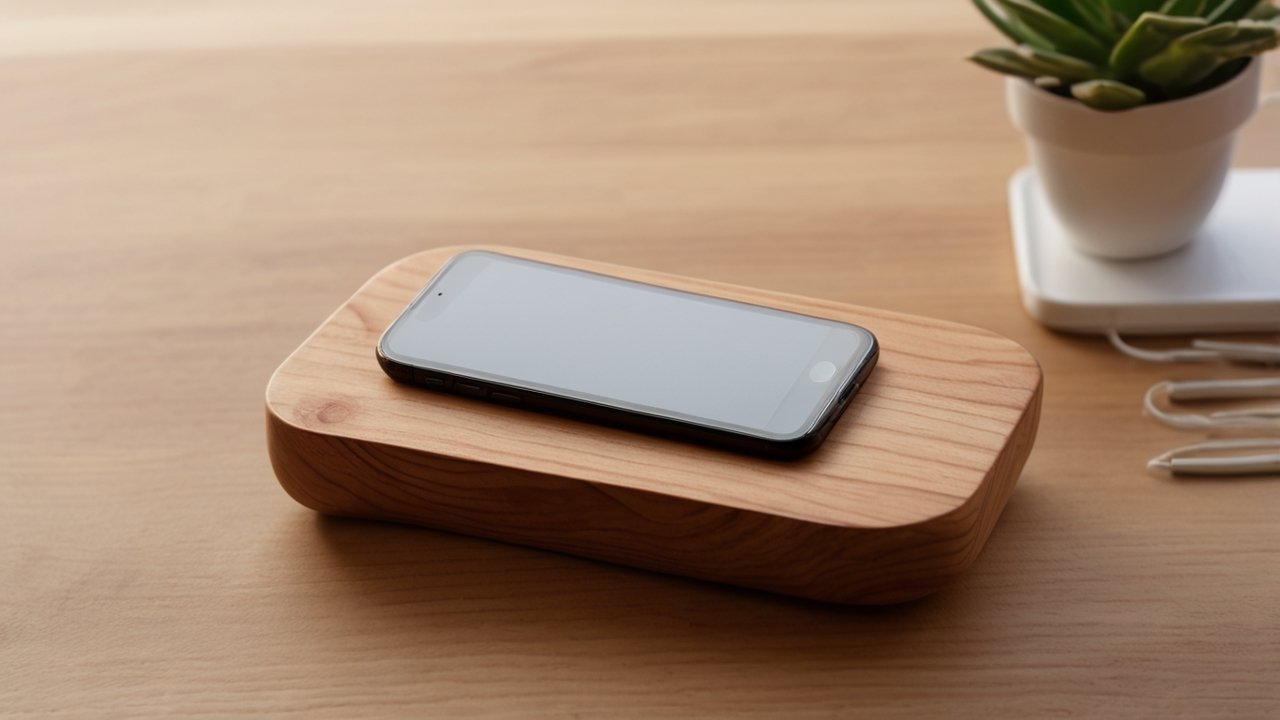
Chapter 6: Desk-Size Phone Stand
Why a Desk-Size Phone Stand Is a Perfect Easy Small Woodworking Project
A desk-size phone stand is one of the most practical easy small woodworking projects you can build. It’s small enough to complete in under an hour, yet useful enough to keep on your desk every day. This little project helps beginners practice precision cutting, angle measurement, sanding, and simple finishing—all without using much wood or requiring advanced tools.
Phone stands make great gifts as well, especially when personalized with initials, angled slots, or decorative finishes.
If you want more beginner-friendly ideas, explore:
👉 Beginner Woodworking Projects: 10 Easy Builds to Try
Materials and Tools You’ll Need for a Wooden Phone Stand
This project requires very few supplies, making it a favorite for weekend makers and first-time woodworkers.
Common materials:
-
Small board (3–5 inches wide)
-
Optional: felt pads for bottom
-
Wood glue (for two-piece designs)
Basic tools:
-
Hand saw, jigsaw, or circular saw
-
Drill (optional for cable pass-through holes)
-
Sandpaper (120–320 grit)
-
Small clamps
-
Finish: oil, wax, polyurethane, or paint
If you’re building your toolkit from scratch, this guide will help you prioritize the essentials:
👉 Beginner-Friendly Woodworking Shop Layouts & Essential Tools
Want an affordable all-in-one workshop setup?
👉 Click here to explore this recommended DIY solution
How to Build a Desk-Size Phone Stand (Beginner-Friendly Steps)
Step 1: Cut the Wood to Size
A simple stand usually consists of one solid piece or two interlocking pieces. A typical size is around 3.5″ x 6″.
Straight cuts work perfectly for most designs. If you want a curved or angled look, a jigsaw is your best friend.
Step 2: Cut the Phone Slot or Angle
A 10–15° back angle makes the phone easy to view. You can achieve this by:
-
Cutting a shallow slot at an angle
-
Gluing two pieces together to form a leaning backrest
-
Cutting a wedge from scrap wood to create your angle
If you’re practicing advanced cuts or joinery basics, this guide is useful:
👉 10 Must-Know Wood Joinery Techniques
Step 3: Sand Smoothly to Remove Sharp Edges
Smooth edges are essential because this project is constantly handled. Start with 120 grit, finish with 220 or 320 for a silky feel.
Step 4: Apply Finish or Paint
A natural oil finish keeps the wood warm and minimal, while polyurethane adds durability. Paint can make it match your workspace or branding.
Need help choosing the right finish?
👉 Top Wood Finishing Techniques
Prefer paint?
👉 Best Paint for Wood Furniture (2025 Edition)
Design Variations for Wooden Phone Stands
Because phone stands require very little material, they’re a great opportunity to explore creative variations:
-
Two-piece puzzle design – Flat pack, easy to travel with
-
Cable passthrough hole – For charging while in use
-
Wide base stand – For tablets or larger phones
-
Rustic look – Aged finish or reclaimed wood
-
Modern minimalist design – Crisp lines + matte black finish
Looking for more small décor builds?
👉 DIY Wood Décor: 15 Ideas to Instantly Upgrade Any Room
Pros and Cons of Making Your Own Phone Stand
Pros
-
Quick build (often under 30 minutes)
-
Uses very little wood
-
High daily usability
-
Easy to personalize
-
Great introduction to angled cuts
Cons
-
Requires accuracy for the phone slot angle
-
Stability depends on correct base sizing
-
Finishing small edges can be time-consuming
Want structured project plans to upgrade your skills?
👉 Check out these affordable woodworking plans →
When You’re Ready for Something More Advanced
Once you’ve made a few phone stands, you’ll feel more confident with measuring and cutting angles. You’re now ready for medium-size builds like serving trays, floating shelves, or even small furniture upgrades.
If you’d like to take a bigger leap and build full-size structures or interior features, consider this:
👉 See this best solution for DIY builders
Thinking about outdoor builds or backyard workspace improvements?
👉 See how you can build your own shed with this step-by-step guide
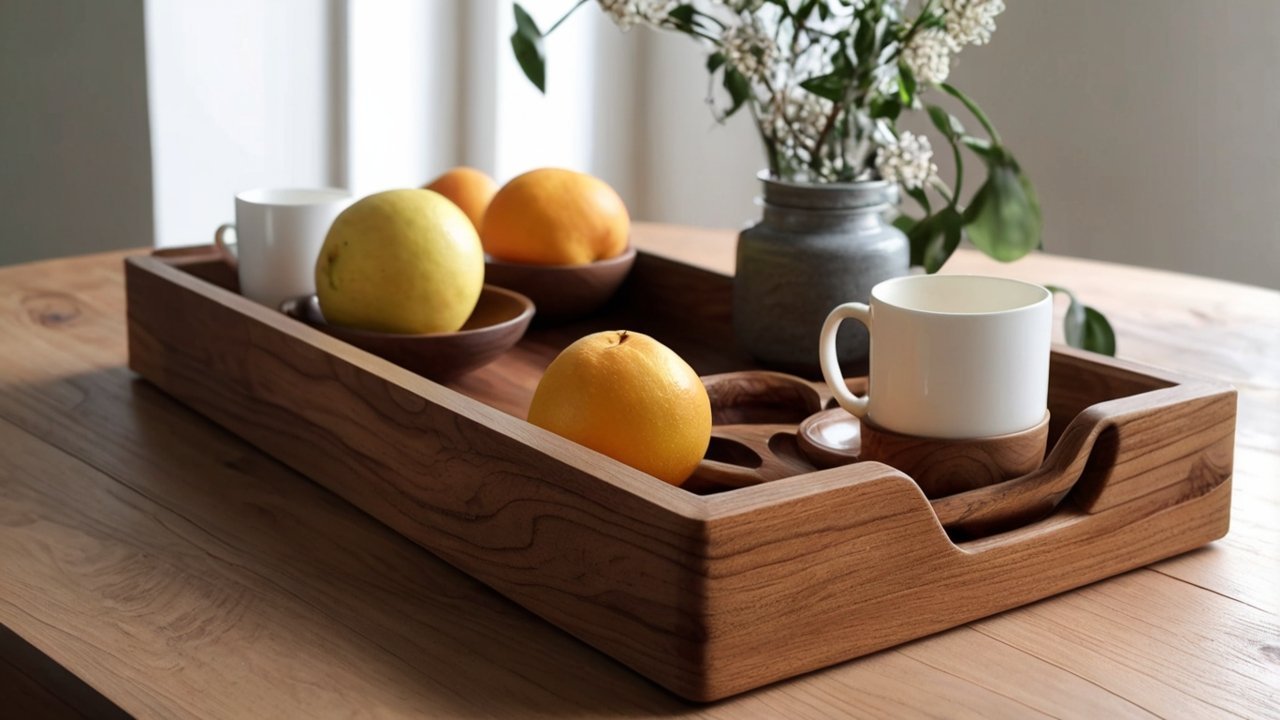
Chapter 7: Wooden Serving Tray
Why a Wooden Serving Tray Is a Perfect Easy Small Woodworking Project
A wooden serving tray is one of the most rewarding easy small woodworking projects because it combines simple construction with high everyday usefulness. Whether you use it for breakfast in bed, carrying drinks to guests, or styling your coffee table, a serving tray delivers both beauty and practicality. Best of all, it helps beginners practice essential skills such as cutting, edge-gluing, assembly, sanding, and finishing—giving you a strong foundation for future furniture projects.
If you’re looking for more beginner-friendly project ideas, check out:
👉 10 Easy Woodworking Projects for Beginners
Materials and Tools You’ll Need to Build a Wooden Serving Tray
Serving trays can be built from a variety of hardwoods or softwoods. Pine and poplar are great beginner choices, while oak or walnut can give a premium feel.
Common materials:
-
Wood board(s) for tray base
-
Narrow strips for the sides
-
Handles (metal, leather, or wood)
-
Screws or brad nails
-
Wood glue
Tools needed:
-
Saw (hand saw, jigsaw, or circular saw)
-
Clamps
-
Drill/driver
-
Sandpaper (120–320 grit)
-
Finish (oil, stain, polyurethane, or paint)
If you’re new to choosing the right wood, here is a helpful reference:
👉 Complete Guide to Choosing the Right Wood
Setting up your workshop for projects like this?
👉 Beginner-Friendly Woodworking Shop Layouts & Essential Tools
Looking for an affordable workshop upgrade?
👉 Click here to explore this recommended DIY solution
How to Build a Wooden Serving Tray (Beginner-Friendly Steps)
Step 1: Cut the Base and Side Pieces
Typical tray sizes range from 12″ x 16″ to 14″ x 20″. Cut your base to size, then rip narrow strips for the side walls (about 2–3 inches tall).
Step 2: Attach the Side Walls
Use wood glue and clamps for a clean bond. Reinforce with brad nails or screws for extra strength. This step teaches essential alignment and assembly skills.
If you’d like to understand joinery basics that help with more challenging builds, visit:
👉 10 Must-Know Wood Joinery Techniques
Step 3: Add Handles
Metal handles give a modern look, while leather straps add warmth. Wooden cutout handles are great for beginners practicing drilling or jigsaw skills.
Step 4: Sand Smoothly
A serving tray gets handled often, so smooth edges matter. Sand from 120 to 220 or 320 grit.
Step 5: Apply Your Preferred Finish
A durable finish like polyurethane protects against spills and makes the tray easy to clean.
Learn pro finishing techniques here:
👉 Top Wood Finishing Techniques
Want details on using polyurethane?
👉 Best Polyurethane Types & How to Apply Them
Design Ideas for Wooden Serving Trays
A serving tray offers unlimited styling possibilities. Beginners often enjoy exploring:
-
Rustic farmhouse tray using distressed wood and black handles
-
Modern minimalist tray with clean edges and matte stain
-
Two-tone tray using contrasting stains or wood species
-
Geometric pattern tray using thin strips or slats
-
Raised-edge tray for secure carrying
If home décor builds interest you, browse:
👉 DIY Wood Décor: 15 Ideas to Instantly Upgrade Any Room
Pros and Cons of Making Your Own Wooden Serving Tray
Pros
-
Functional and useful in daily life
-
Great practice for basic assembly
-
Easy to customize
-
Makes a beautiful handmade gift
-
Works with affordable materials
Cons
-
Requires accurate measurements to prevent wobble
-
Finishing takes time to fully cure
-
Handles require proper alignment for balance
Looking for more structured plans to elevate your skills?
👉 Check out these affordable woodworking plans →
When You’re Ready for More Advanced Serving or Kitchen Builds
After building a serving tray, you’ll have the confidence to move into medium-sized kitchen or dining projects like charcuterie boards, cutting boards, or small side tables.
If you’re exploring larger furniture or DIY home builds, consider this comprehensive system:
👉 See this best solution for DIY builders
If you prefer outdoor woodworking projects, you might enjoy building storage, garden tables, or even backyard sheds:
👉 See how you can build your own shed with this step-by-step guide
Chapter 8: Mini Floating Shelves
Why Mini Floating Shelves Are Excellent Easy Small Woodworking Projects
Mini floating shelves are one of the most stylish and functional easy small woodworking projects you can build. They’re compact, simple in structure, and instantly transform small spaces like bathrooms, office corners, and entryways. Because the design hides the mounting hardware, beginners get practice with precision drilling and leveling while learning how to create a clean, modern look.
These shelves are ideal for showcasing décor, candles, small planters, or everyday essentials. With just a few scraps of wood and basic tools, you can complete this project in under an hour.
Looking for more beginner project ideas?
👉 10 Easy Woodworking Projects for Beginners
Materials and Tools You’ll Need for Mini Floating Shelves
Materials:
-
Wood board (pine, poplar, or hardwood)
-
Mounting bracket or dowel rod
-
Screws and wall anchors
-
Wood glue (optional)
-
Finish (stain, oil, or paint)
If you’re unsure which wood type fits your shelf design, here’s a helpful guide:
👉 Complete Guide to Choosing the Right Wood
Tools:
-
Hand saw or circular saw
-
Drill/driver
-
Level
-
Sandpaper (120–220 grit)
Setting up your workshop for projects like this becomes much easier with:
👉 Beginner-Friendly Woodworking Shop Layouts & Essential Tools
Or get an affordable workshop setup with this top-rated solution:
👉 Click here to explore this recommended DIY solution
How to Build Mini Floating Shelves (Beginner-Friendly Steps)
Step 1: Cut Your Wood Pieces
Mini floating shelves typically range from 6″ to 12″ long. Straight cuts work well, and beginners find this a low-stress step that builds confidence.
Step 2: Drill Mounting Holes or Install Bracket
Depending on your hardware, drill holes in the shelf to slide onto dowels, or mount a metal floating bracket first. Accuracy here makes the shelf appear seamless.
Want to improve your joinery and drilling skills?
👉 10 Must-Know Wood Joinery Techniques
Step 3: Sand Smoothly
Smooth edges give your shelf a polished appearance and make finishing easier. Sand to 220 grit.
Step 4: Apply Finish or Paint
Floating shelves look great in natural wood, but painted finishes also match modern décor well.
Learn finishing techniques here:
👉 Top Wood Finishing Techniques
Prefer a painted finish?
👉 Best Paint for Wood Furniture (2025 Edition)
Step 5: Mount on the Wall
Use a level to make sure the shelf is perfectly horizontal. A slight tilt is easy to notice because the shelf is small—so take your time here.
Design Variations for Mini Floating Shelves
Floating shelves offer almost unlimited style options. Popular beginner-friendly variations include:
-
Minimalist block shelf – Single board, clean edges
-
Beveled edge shelf – Slight angled edges for a refined look
-
Two-tone shelf – Painted base, natural wood top
-
Small box-style floating shelf – Great for holding planters
-
Rustic reclaimed wood shelf – Textured finish + dark stain
For more décor-oriented woodworking ideas, check out:
👉 DIY Wood Décor: 15 Ideas to Instantly Upgrade Any Room
Pros and Cons of Mini Floating Shelves
Pros
-
Stylish and visually clean
-
Excellent use of small scrap boards
-
Beginner-friendly woodworking steps
-
Great for bathrooms and small spaces
-
Highly customizable in color and finish
Cons
-
Requires precise leveling
-
Wall anchors vary by wall type
-
Small size limits heavy loads
For structured woodworking plans that help you build wall storage, furniture, and more:
👉 Check out these affordable woodworking plans →
When You’re Ready for More Advanced Shelving Projects
After mastering mini floating shelves, you can move on to larger shelving systems such as floating bookshelves, pantry shelves, or modular storage walls. These projects require stronger joinery and more accurate measuring, making them a logical next step.
If you want to build full shelves, cabinets, or even tiny homes, this program is ideal:
👉 See this best solution for DIY builders
More interested in outdoor builds?
👉 See how you can build your own shed with this step-by-step guide
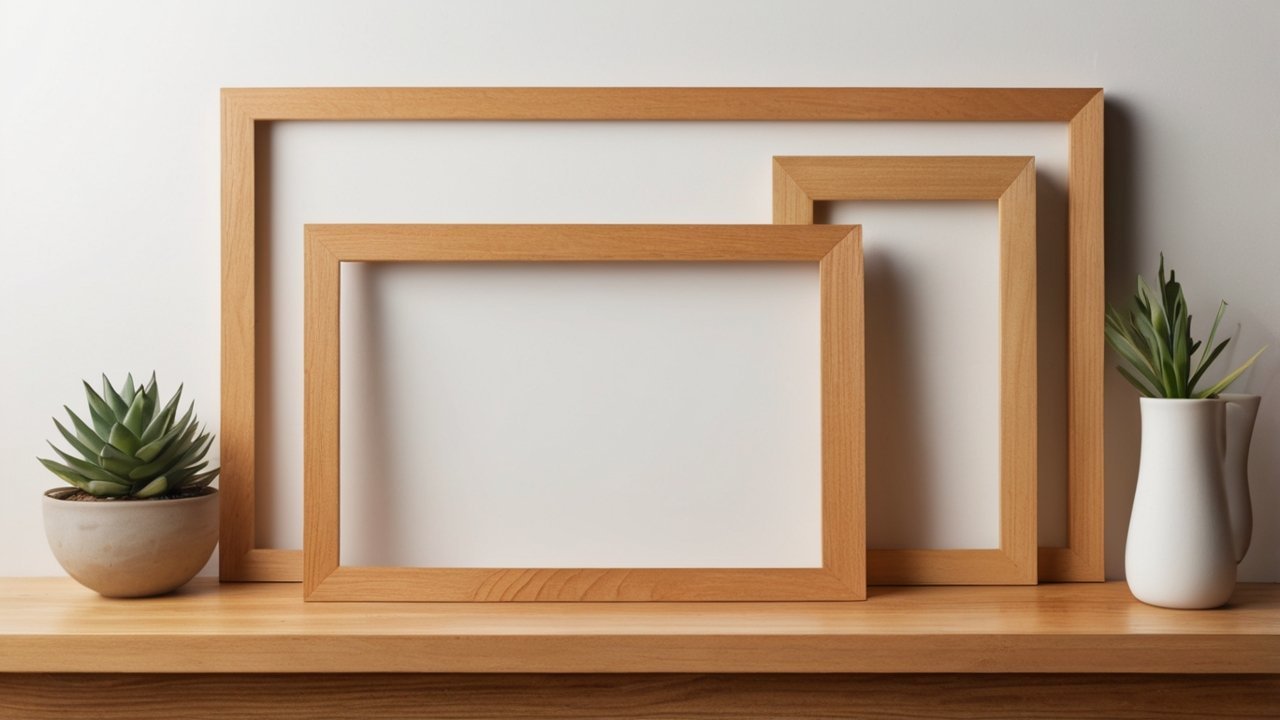
Chapter 9: Simple Picture Frames
Why Simple Picture Frames Are Perfect Easy Small Woodworking Projects
Simple picture frames are classic easy small woodworking projects because they deliver high visual impact while teaching essential woodworking fundamentals—accurate measuring, miter cuts, sanding, and clean finishing. Frames are extremely customizable and make wonderful gifts, décor additions, or photography displays. Plus, they’re inexpensive to build, often using only a few thin boards or even scrap wood.
If you want additional beginner build ideas, here’s a helpful resource:
👉 Beginner Woodworking Projects: 10 Easy Builds to Try
Materials and Tools You’ll Need for Simple Wooden Picture Frames
Materials:
-
Thin boards (1×2 or similar)
-
Backing board (plywood or MDF)
-
Clear acrylic or glass (optional)
-
Small nails or brad nails
-
Wood glue
Learn which wood types are best for frames using this guide:
👉 Complete Guide to Choosing the Right Wood
Tools:
-
Saw capable of making 45-degree miter cuts
-
Sandpaper (120–320 grit)
-
Clamps
-
Square or miter gauge
-
Drill (optional for hanging hardware)
Need help building a functional beginner workshop?
👉 Beginner-Friendly Woodworking Shop Layouts & Essential Tools
Or get an affordable workshop upgrade here:
👉 Click here to explore this recommended DIY solution
How to Build Simple Wooden Picture Frames (Beginner-Friendly Steps)
Step 1: Measure Your Artwork or Photo
Add 1/8″ clearance on each side so the photo fits comfortably. Precision at this stage means less adjusting later.
Step 2: Cut the Frame Pieces with 45° Miters
You’ll need four pieces—top, bottom, and two sides. Mitered corners give your frame a clean, professional look and help you practice angled cuts.
If you’d like to improve your joinery techniques or cutting accuracy, explore:
👉 10 Must-Know Wood Joinery Techniques
Step 3: Glue and Clamp the Frame
Apply a small amount of wood glue to each miter joint and clamp the frame tightly. Beginners often use painter’s tape as a simple alternative to clamps for small frames.
Step 4: Sand Smoothly
Once the glue cures, sand the frame thoroughly—especially along the joints. Smooth transitions make your frame look store-bought.
Step 5: Apply Finish or Paint
Picture frames look great in natural wood, but paint allows you to match your home décor.
Learn how to create a professional finish here:
👉 Top Wood Finishing Techniques
Prefer paint instead of stain?
👉 Best Paint for Wood Furniture (2025 Edition)
Step 6: Add Backing and Hanging Hardware
You can use small nails, tabs, or screws to secure the backing. Add a sawtooth hanger or D-ring for wall mounting.
Design Variations for Picture Frames
Picture frames offer endless creativity. Here are a few popular beginner-friendly styles:
-
Rustic frame – Distressed wood + weathered gray stain
-
Modern minimalist frame – Thin profile + matte black paint
-
Floating acrylic frame – Wood supports with see-through edges
-
Wide farmhouse frame – Chunky wood style for statement pieces
-
Layered trim frame – Adds depth using narrow accent strips
For more décor-style woodworking projects, explore:
👉 DIY Wood Décor: 15 Ideas to Instantly Upgrade Any Room
Pros and Cons of Making Your Own Picture Frames
Pros
-
Very low material cost
-
Great practice for precision cuts
-
High decorative impact
-
Customizable to any size or style
-
Ideal for gifting or home décor
Cons
-
Requires accurate miter cuts
-
Glue-up can be tricky without proper clamping
-
Larger frames need strong joinery
If you want ready-made project plans that include frame styles and other small builds, check:
👉 Check out these affordable woodworking plans →
When You’re Ready for More Advanced Frame or Décor Projects
After mastering picture frames, you can try:
-
Shadow boxes
-
Decorative mirror frames
-
Wall-art panels
-
Multi-opening gallery frames
If you’re planning to build larger home décor or furniture pieces, this comprehensive program is a powerful next step:
👉 See this best solution for DIY builders
Want to explore outdoor frames, garden structures, or shed projects?
👉 See how you can build your own shed with this step-by-step guide

Chapter 10: Wooden Candle Holders
Why Wooden Candle Holders Are Great Easy Small Woodworking Projects
Wooden candle holders are one of the most creative and versatile easy small woodworking projects you can make with scrap wood. They’re simple, quick, and highly customizable—perfect for beginners who want a weekend craft that looks store-bought. Whether you’re making tealight blocks, multi-hole centerpieces, or rustic pillar-style holders, this project helps you practice drilling, shaping, sanding, and finishing.
Candle holders also make great handmade gifts and popular craft-fair items, making them a rewarding choice for DIY hobbyists.
Want more beginner-friendly DIY ideas?
👉 10 Easy Woodworking Projects for Beginners
Materials and Tools You’ll Need for Wooden Candle Holders
Materials:
-
Scrap 2×4, 4×4, or hardwood blocks
-
Tealight candles, glass inserts, or pillar candles
-
Sandpaper (120–320 grit)
-
Wood finish: oil, wax, stain, or polyurethane
Choosing the right wood type can affect both safety and aesthetics. Learn more here:
👉 Complete Guide to Choosing the Right Wood
Tools:
-
Drill or drill press
-
Forstner bit (typically 1⅜” for tealights)
-
Saw (hand saw, miter saw, or jigsaw)
-
Clamps
-
Measuring tools
Setting up your workshop for small builds like this is easier with:
👉 Beginner-Friendly Woodworking Shop Layouts & Essential Tools
Affordable workshop setup option:
👉 Click here to explore this recommended DIY solution
How to Build Wooden Candle Holders (Beginner-Friendly Steps)
Step 1: Cut Your Wood to Size
Most candle holders range from 3″ to 12″ long. Common shapes include:
-
Single tealight block
-
Three-hole centerpiece
-
Tall pillar-style block
Straight cuts make this an ideal project for beginners wanting a simple start.
Step 2: Drill the Candle Holes
Use a Forstner bit for smooth, flat-bottom holes. Drill to a depth that fits your tealight or glass insert securely.
This step is great practice for controlled drilling—an essential woodworking skill.
If you’d like to refine drilling accuracy or improve joinery skills, check out:
👉 10 Must-Know Wood Joinery Techniques
Step 3: Sand Thoroughly
Sand all edges and corners to prevent splinters. Rounded edges make the candle holder feel refined and safe to handle.
Step 4: Apply Finish
Depending on the style you’re aiming for:
-
Natural oil → warm, organic aesthetic
-
Dark stain → rustic or farmhouse vibe
-
Matte black paint → modern minimalist look
Learn professional finishing methods here:
👉 Top Wood Finishing Techniques
Need a durable protective finish?
👉 Best Polyurethane Types & How to Apply Them
Creative Candle Holder Variations
Wooden candle holders are incredibly customizable. Here are some beginner-friendly concepts:
-
Three-hole tealight centerpiece for dining tables
-
Tall single pillar holder made from 4×4 posts
-
Multi-level candle block using varied board thickness
-
Driftwood-style holder made from reclaimed timber
-
Pattern-carved candle block using simple chisels or wood-burning tools
Want more décor-friendly woodworking builds?
👉 DIY Wood Décor: 15 Ideas to Instantly Upgrade Any Room
Pros and Cons of Wooden Candle Holder Projects
Pros
-
Uses inexpensive scrap wood
-
Extremely fast project
-
Beginner-friendly drilling
-
Easy to personalize
-
Makes high-quality handmade gifts
Cons
-
Must follow safety guidelines regarding heat
-
Improperly sized holes can create instability
-
Finishes must be fully cured before use
If you’d like curated, step-by-step woodworking plans that include similar décor projects, explore:
👉 Check out these affordable woodworking plans →
When You’re Ready for Larger or More Intricate Projects
After building several candle holders, you may be ready to move into projects requiring better shaping and joinery, such as:
-
Wall-mounted candle shelves
-
Large centerpiece trays
-
Carved décor blocks
-
Lantern-style wooden housings
If you’re interested in expanding your skill set toward furniture or home-building projects, this resource is a strong next step:
👉 See this best solution for DIY builders
Or explore backyard builds and outdoor storage structures:
👉 See how you can build your own shed with this step-by-step guide

Chapter 11: Small Storage Crates
Why Small Storage Crates Are Excellent Easy Small Woodworking Projects
Small storage crates are one of the most useful easy small woodworking projects you can build. They’re practical, lightweight, and work beautifully for organizing home offices, kids’ rooms, closets, craft spaces, and even pantry shelves. Because the construction involves simple cutting, spacing, and assembly, crates help beginners practice core skills like measuring, drilling, and working with nails or screws.
They’re also a great way to repurpose leftover wood. Whether you’re using pine boards, slats, or even reclaimed fence pieces, storage crates deliver both functionality and rustic charm.
More beginner ideas here:
👉 10 Easy Woodworking Projects for Beginners
Materials and Tools Needed for Small Storage Crates
Materials:
-
Bottom panel (plywood or slatted boards)
-
Side slats (1×3 or 1×4 boards)
-
End panels
-
Wood glue (optional)
-
Nails or screws
-
Optional: handles, rope, or cutout grips
If you’re unsure which wood to use, this guide helps you pick the right type:
👉 Complete Guide to Choosing the Right Wood
Tools required:
-
Saw (hand saw, circular saw, or jigsaw)
-
Drill/driver
-
Sandpaper (120–220 grit)
-
Clamps
-
Brad nailer (optional but speeds up build time)
Planning your first workshop layout?
👉 Beginner-Friendly Woodworking Shop Layouts & Essential Tools
Or check out this popular low-budget setup solution:
👉 Click here to explore this recommended DIY solution
How to Build a Small Wooden Storage Crate (Beginner-Friendly Steps)
Step 1: Cut the Bottom and Side Panels
A typical crate uses a rectangular bottom and slatted sides. For example, a 12″ x 16″ crate works well for pantry or kids’ room storage.
Step 2: Assemble the Outer Frame
Attach the end panels first, then the long sides. Use wood glue and screws or nails. Beginners love this step because it teaches essential box-building techniques used in furniture making.
If you’d like to learn more useful joinery approaches, check out:
👉 10 Must-Know Wood Joinery Techniques
Step 3: Attach the Slats
Space them evenly for a clean, organized look. The gaps make the crate lighter and easier to carry. Use nails or screws for each slat.
Step 4: Add Handles
You can drill circular cutout handles, screw on metal handles, or add rope for a rustic farmhouse touch.
Step 5: Sand and Finish
A simple light sanding removes sharp edges. Choose a finish that fits your décor—natural, stained, or painted.
Learn finishing techniques here:
👉 Top Wood Finishing Techniques
Or get paint recommendations here:
👉 Best Paint for Wood Furniture (2025 Edition)
Design Variations for Small Storage Crates
Crates are extremely flexible in design. Here are beginner-friendly ideas:
-
Rustic farmhouse crate – Distressed paint + rope handles
-
Modern slatted crate – Thin gaps + clean edges
-
Kid-friendly crate – Bright paint + nameplate front
-
Rolling storage crate – Add four caster wheels
-
Stackable crate set – Uniform sizing for modular storage
Looking for more small décor and home-upgrade woodworking ideas?
👉 DIY Wood Décor: 15 Ideas to Instantly Upgrade Any Room
Pros and Cons of Making Your Own Storage Crates
Pros
-
Extremely functional for organizing any room
-
Beginner-friendly construction
-
Budget-friendly—great use of scrap wood
-
Highly customizable
-
Light and easy to move
Cons
-
Requires accurate panel alignment
-
Slats must be evenly spaced
-
Painted or stained crates need time to dry
Want step-by-step printable plans for crates and other practical builds?
👉 Check out these affordable woodworking plans →
When You’re Ready to Build Larger Storage or Organization Projects
After mastering small crates, you’ll be ready for projects like:
-
Multi-tier shelving units
-
Rolling storage carts
-
Entryway benches with storage
-
Closet organizers
-
Outdoor storage boxes
Here’s a helpful program for advancing toward furniture or tiny home construction:
👉 See this best solution for DIY builders
More interested in outdoor or garden storage projects?
👉 See how you can build your own shed with this step-by-step guide

Chapter 12: Cutting Board for Beginners
Why a Cutting Board Is One of the Best Easy Small Woodworking Projects for Beginners
A cutting board is one of the most classic, useful, and confidence-building easy small woodworking projects you can make. Unlike decorative projects, a cutting board requires durability, smooth sanding, and food-safe finishing—skills that help you level up quickly as a woodworker. It’s a rewarding project that teaches accuracy, grain direction, sanding technique, and finishing discipline.
Cutting boards are also practical gifts and can last many years when built and maintained properly.
Looking for more beginner woodworking builds?
👉 10 Easy Woodworking Projects for Beginners
Best Wood Types for Beginner Cutting Boards
Choosing the right wood is essential, especially for food-related projects. Hardwoods are the best choice because they are strong, have tight grain structures, and resist moisture well.
Recommended woods:
-
Maple (industry standard, food-safe, durable)
-
Walnut (beautiful dark tone, easy to sand)
-
Cherry (smooth to work with, ages beautifully)
Avoid softwoods like pine—they’re too porous and can trap bacteria.
For a deeper breakdown of wood species and their uses:
👉 Complete Guide to Choosing the Right Wood
Tools and Materials You’ll Need
Materials:
-
Hardwood board(s)
-
Food-safe mineral oil or cutting board conditioner
-
Optional: edge-grain or end-grain glue-ups for advanced versions
Tools:
-
Saw (table saw or circular saw)
-
Clamps (for multi-piece glue-ups)
-
Sandpaper (80, 120, 220, 320 grit)
-
Router (optional for rounded edges)
If you’re just getting your workspace organized, here’s a helpful guide:
👉 Beginner-Friendly Woodworking Shop Layouts & Essential Tools
Need a budget-friendly workshop setup?
👉 Click here to explore this recommended DIY solution
How to Build a Simple Cutting Board (Beginner-Friendly Steps)
Step 1: Cut the Board to Size
A beginner board size is around 8″ × 12″ or 10″ × 14″. Straight cuts work perfectly and help you practice clean edges.
Step 2: Glue and Clamp (If Making Multi-Piece Boards)
Edge-glued boards are a great introduction to panel glue-ups. Apply glue evenly and clamp tightly, checking that the boards align flush.
If you’d like to learn essential joinery techniques for bigger glue-ups later, check out:
👉 10 Must-Know Wood Joinery Techniques
Step 3: Sand Smoothly and Evenly
This is the longest and most important step.
Typical sanding progression:
-
80 grit → flatten
-
120 grit → smooth
-
220 grit → refine
-
320 grit → polish
Take your time here—smoothness matters for both food safety and appearance.
Step 4: Add Optional Edge Details
A round-over router bit softens sharp edges and gives a professional feel. Beginners can also simply hand-sand the corners to a gentle round.
Step 5: Apply Food-Safe Finish
A cutting board must be finished with food-safe products such as:
-
Mineral oil
-
Beeswax + oil conditioner
-
Commercial cutting board oil
Finishing protects the board from moisture and enhances grain color.
Learn more about achieving a pro-level finish:
👉 Top Wood Finishing Techniques
Want a deeper guide to polyurethane? (Note: not for cutting surfaces, but useful for other projects.)
👉 Best Polyurethane Types & How to Apply Them
Beginner-Friendly Cutting Board Design Variations
Once you understand the basics, try these fun variations:
-
Striped edge-grain board – alternating maple, cherry, and walnut
-
Rustic single-board paddle – great for charcuterie
-
Rounded handle board – cut with a jigsaw
-
Juice-groove board – added with a router
-
Mini chopping board – perfect scrap wood project
If you love décor and kitchen builds, you may also enjoy:
👉 DIY Wood Décor: 15 Ideas to Instantly Upgrade Any Room
Pros and Cons of Making Your Own Cutting Board
Pros
-
Highly practical everyday item
-
Great introduction to sanding and finishing
-
Excellent beginner glue-up practice
-
Makes meaningful handmade gifts
-
Long-lasting when maintained properly
Cons
-
Requires patience during finishing
-
Hardwood can be slightly more expensive
-
Needs regular oiling over time
Want detailed, printable plans for small kitchen projects like this?
👉 Check out these affordable woodworking plans →
When You’re Ready to Move to More Advanced Board Projects
Once you’ve built a simple cutting board, you’ll feel ready to explore:
-
End-grain cutting boards
-
Pastry boards
-
Serving paddles
-
Routed juice grooves
-
Multi-wood patterned boards
If you dream of expanding into furniture, cabinetry, or even tiny home construction, this program is an excellent step forward:
👉 See this best solution for DIY builders
If outdoor woodworking appeals to you, consider stepping into backyard builds:
👉 See how you can build your own shed with this step-by-step guide

Chapter 13: Simple Birdhouse
Why a Simple Birdhouse Is a Perfect Easy Small Woodworking Project
A simple birdhouse is one of the most classic outdoor-friendly easy small woodworking projects for beginners. It helps you practice precise cutting, drilling, assembly, and outdoor finishing—yet the build itself is simple and forgiving. Birdhouses bring life to your backyard, attract birds that help control insects, and make great weekend family projects.
Whether you want to decorate your garden or give birds a safe nesting place, this project blends creativity and function perfectly.
Want more outdoor project ideas?
👉 Outdoor Woodworking Projects: 10 Easy DIY Builds
Materials and Tools You’ll Need for a Simple Birdhouse
Materials:
-
1×6 or 1×8 pine or cedar boards
-
Outdoor screws or nails
-
Wood glue (optional for added strength)
-
Exterior-grade wood finish or paint
-
Hinges (optional for a clean-out door)
If you’re unsure which type of wood works best outdoors, check:
👉 Complete Guide to Choosing the Right Wood
Tools:
-
Saw (hand saw, jigsaw, or circular saw)
-
Drill + hole saw (1–1.5″ depending on bird species)
-
Measuring tape
-
Screwdriver or drill driver
-
Sandpaper (120–220 grit)
New to setting up your woodworking workspace?
👉 Beginner-Friendly Woodworking Shop Layouts & Essential Tools
Or consider this budget-friendly workshop setup:
👉 Click here to explore this recommended DIY solution
How to Build a Simple Birdhouse (Beginner-Friendly Steps)
Step 1: Cut the Panels
A basic birdhouse uses six parts:
-
Front panel with entrance hole
-
Back panel
-
Two side walls
-
Roof panels
-
Floor
Most cuts are straight, making this project beginner-friendly and easy to complete.
Step 2: Drill the Entrance Hole
Use a hole saw (typically 1–1.5 inches). The hole size determines which birds will use the house—smaller holes attract wrens and chickadees.
Step 3: Assemble the Walls
Use screws for a sturdy build, especially for outdoor use. Apply a small amount of wood glue to the joints for extra strength.
If you’d like to improve assembly skills or joinery basics, here’s a useful guide:
👉 10 Must-Know Wood Joinery Techniques
Step 4: Attach the Roof
A simple slanted roof helps rain run off. You can glue and screw it into place or add a hinge for easy nesting material cleanup.
Step 5: Sand and Apply Outdoor Finish
Sand all sharp edges, especially around the entrance hole.
Use an exterior-grade finish (not polyurethane for outdoor exposure).
Need help choosing the right finish?
👉 Top Wood Finishing Techniques
For weather-resistant paint options:
👉 Best Paint for Wood Furniture (2025 Edition)
Design Variations for Beginner Birdhouses
Birdhouses are fun to personalize. Popular beginner variations include:
-
Rustic cabin-style birdhouse with stained wood
-
Modern minimalist house with clean lines and matte paint
-
Multi-bird nesting box (larger project for advanced beginners)
-
Decorative patterned house using stencils or wood burning
-
Hinged clean-out design for easy maintenance
For more home décor–friendly woodworking projects, try:
👉 DIY Wood Décor: 15 Ideas to Instantly Upgrade Any Room
Pros and Cons of Building Your Own Birdhouse
Pros
-
Excellent outdoor woodworking experience
-
Helps local bird populations thrive
-
Uses inexpensive or scrap wood
-
Beginner-friendly construction
-
Highly customizable in size and style
Cons
-
Requires proper weatherproofing
-
Entrance size must match bird species
-
Needs occasional cleaning and maintenance
Want detailed printable plans for birdhouses and other outdoor builds?
👉 Check out these affordable woodworking plans →
When You’re Ready to Explore More Outdoor Woodworking Projects
After building your first birdhouse, you’re ready for more outdoor-friendly woodworking projects such as:
-
Raised garden beds
-
Outdoor benches
-
Planter stands
-
Garden tool organizers
-
Small storage sheds
If you’re looking to advance your woodworking skills or tackle larger structures, this program is a strong next step:
👉 See this best solution for DIY builders
Want to build practical outdoor structures like sheds or playhouses?
👉 See how you can build your own shed with this step-by-step guide

Chapter 14: Tips to Save Time and Reduce Mistakes
Why These Time-Saving and Mistake-Reducing Tips Matter for Easy Small Woodworking Projects
As you continue building easy small woodworking projects, efficiency and accuracy become just as important as creativity. Beginners often spend extra time fixing preventable issues—uneven cuts, rough surfaces, alignment problems, or poorly chosen finishes. The good news? These challenges are easily avoidable with a few practical habits.
By applying the tips below, you’ll shorten your build time, reduce frustration, and start producing cleaner, more professional-looking projects. These techniques also set you up for success as you progress to larger woodworking builds in the future.
Looking for more beginner-friendly guidance?
👉 Beginner Woodworking Projects: 10 Easy Builds to Try
Pre-Sand Your Boards Before Assembly
Sanding before assembly saves an impressive amount of time. It’s far easier to smooth flat boards than working inside corners or tight spaces once your project is assembled.
Why it works:
-
Eliminates hard-to-reach sanding spots
-
Reduces project cleanup time
-
Helps finishes absorb evenly
Improve your finishing workflow with:
👉 Top Wood Finishing Techniques
Use a Cutting Template for Repeated Cuts
If your project requires multiple identical pieces—like slats, shelves, or coasters—use one cleanly cut board as your master template.
Benefits:
-
Ensures consistency
-
Reduces measuring errors
-
Speeds up cutting dramatically
Want to understand joinery and precise alignment techniques?
👉 10 Must-Know Wood Joinery Techniques
Mark Your Boards Clearly Before Cutting
A good marking process helps avoid mix-ups and wasted material. Mark:
-
Cut lines
-
Face side
-
Grain direction
-
Assembly orientation
Clear labeling will prevent mistakes like flipped pieces or incorrect bevel angles.
Need help choosing wood that cuts consistently?
👉 Complete Guide to Choosing the Right Wood
Test Finishes on Scrap Wood First
Finishes can look dramatically different depending on the species of wood and sanding grit. Testing ahead saves you from accidentally ruining a nearly completed project.
Try a small sample using your intended:
-
Stain
-
Oil
-
Paint
-
Polyurethane
Prefer painted projects?
👉 Best Paint for Wood Furniture (2025 Edition)
Drill Pilot Holes to Prevent Splitting
Beginners often skip this step and end up splitting thin boards. Pilot holes keep your project clean and help screws go in straight.
Pilot holes are essential for:
-
Picture frames
-
Storage crates
-
Planter boxes
-
Birdhouses
-
Phone stands
Strengthen your drilling & fastening skills with:
👉 Beginner-Friendly Woodworking Shop Layouts & Essential Tools
Keep Clamps Ready—and Use More Than You Think You Need
Clamps act as your extra hands. Use them whenever gluing, aligning, or keeping pieces steady.
Pro tip:
You rarely regret using too many clamps… but you often regret using too few.
If you want a more efficient workshop setup, check out this solution:
👉 Click here to explore this recommended DIY solution
Dry-Fit Every Project Before Applying Glue
A dry fit lets you see whether all pieces align, sit square, and assemble cleanly before anything becomes permanent.
Dry fitting prevents:
-
Gaps in joints
-
Misaligned angles
-
Last-minute panic during glue-up
Get ready for more advanced building with help from structured plans:
👉 Check out these affordable woodworking plans →
Take Your Time on the First Cut—and Every Other Cut Will Go Faster
Rushed cuts lead to uneven edges and wasted boards. Take a moment to measure carefully and cut confidently. As the saying goes: “Slow is smooth, smooth is fast.”
When You’re Ready for More Advanced Woodworking Efficiency
Once you master these beginner-friendly techniques, you’ll find your woodworking time becomes more enjoyable and your results far more consistent. This is the stage where many hobbyists feel ready to move into:
-
Cabinet building
-
Furniture projects
-
Outdoor structures
-
Workshop upgrades
-
Tiny home construction
If you’re ready to move up, consider this popular program:
👉 See this best solution for DIY builders
Or start building larger backyard structures:
👉 See how you can build your own shed with this step-by-step guide

Chapter 15: Where to Find Free or Low-Cost Woodworking Plans
Why Good Woodworking Plans Matter for Easy Small Woodworking Projects
As you continue building easy small woodworking projects, having access to clear, reliable woodworking plans becomes increasingly important. Plans save you from guesswork, reduce material waste, and help you learn new techniques step by step. Whether you’re building shelves, décor pieces, storage crates, or future furniture, the right plans will dramatically improve your success rate.
High-quality plans also help beginners understand proper joinery, cutting lists, and assembly sequences—skills that carry over into every future project you tackle.
If you’re new to woodworking, start with simple beginner builds:
👉 Beginner Woodworking Projects: 10 Easy Builds to Try
Free Woodworking Plans from Reputable Websites
Many trusted DIY and woodworking communities offer free project plans that are beginner-friendly and easy to follow.
1. DIY Wood Haven (Free Guides & Tutorials)
DIY Wood Haven regularly publishes free project guides covering wood selection, finishing, beginner builds, and more:
👉 Visit DIY Wood Haven
Some helpful articles include:
These are excellent resources for leveling up your skills with zero cost.
Low-Cost Woodworking Plan Bundles (High Value)
If you want a more structured library of plans—especially ones that include diagrams, cut lists, 3D drawings, and step-by-step instructions—low-cost woodworking bundles offer tremendous value.
Recommended Option for Beginners
👉 Check out these affordable woodworking plans →
This collection includes dozens of beginner and intermediate plans and is perfect for learners who want to avoid mistakes and save time.
Specialty Plan Collections (Projects, Sheds, Tiny Homes, and More)
Once you’ve completed several small projects, you may want to expand into larger or more ambitious builds. Here are some highly recommended specialty plan resources:
Sheds, Outdoor Storage & Garden Structures
Ideal for DIYers wanting to build outdoor projects with clear diagrams and lumber lists.
👉 See how you can build your own shed with this step-by-step guide
Tiny Home Construction Plans
Perfect for advanced beginners interested in micro-living or building functional small spaces.
👉 See this best solution for DIY builders
Workshop Setup Plans & Tool Layout Guides
Great for woodworking efficiency and improving your workspace flow.
👉 Click here to explore this recommended DIY solution
How to Evaluate a Good Woodworking Plan
Not all plans are created equal. A quality plan should include:
-
A complete materials list
-
Accurate cut diagrams
-
Step-by-step instructions
-
Joinery details
-
Clear measurements and labels
-
Illustrations or 3D views
-
Finishing recommendations
Avoid plans that leave out steps, use unclear diagrams, or assume complex skills without explaining them.
Benefits of Using High-Quality Woodworking Plans
Using dependable plans can:
-
Save time and reduce mistakes
-
Help you learn new techniques
-
Prevent material waste
-
Boost confidence for new projects
-
Teach you how pros approach layout and assembly
If you’re serious about improving as a woodworker, consider building a plan library with:
👉 These affordable woodworking plans →
When You’re Ready to Grow Beyond Beginner Projects
Once you’ve completed a series of small builds and feel comfortable with the basics, you’re ready to:
-
Build small furniture
-
Create custom shelving
-
Craft home décor pieces
-
Build outdoor structures
-
Assemble advanced joinery projects
-
Even build backyard sheds or tiny homes
For structured skill progression, consider:
👉 See this best solution for DIY builders
And for outdoor storage or backyard shop expansion:
👉 See how you can build your own shed with this step-by-step guide

Final Chapter: Conclusion & Affiliate Disclosure
Conclusion: Your Woodworking Journey Starts with Small, Simple Wins
By working through these easy small woodworking projects, you’ve gained the foundational skills that every woodworker builds upon—accurate measuring, sanding, assembly, drilling, finishing, and creative problem-solving. With each project, you’ve learned not only how to shape wood but also how to shape your confidence as a DIY maker.
From coasters, shelves, and phone stands to cutting boards, crates, and birdhouses, these small builds teach the same essential principles used in furniture making and larger outdoor structures. They’re proof that you don’t need a big workshop or expensive tools to create something useful and beautiful with your own hands.
If you’d like help taking the next step—whether building furniture, organizing your workshop, or creating outdoor projects—here are some popular resources readers love:
👉 Affordable Woodworking Plans for Beginners →
👉 Step-by-Step Shed Plans for Outdoor Builders
👉 Tiny House Made Easy (For Ambitious DIY Builders)
👉 Starter Workshop Setup Guide
Wherever your woodworking journey takes you, keep learning, keep experimenting, and most importantly—keep building.
Affiliate Disclosure
This article contains affiliate links. If you click on a link and purchase a product or plan, I may earn a small commission at no additional cost to you. These recommendations are carefully chosen based on practicality, value, and usefulness for beginners working on easy small woodworking projects. Your support helps me continue creating free woodworking guides and tutorials for the community.
If you have questions about any recommended tools, plans, or materials, feel free to reach out—I’m here to help you build with confidence.

📘10 Easy DIY Wood Projects for the Weekend
Looking for a fun and rewarding weekend activity?
With this FREE eBook, you’ll discover 10 beginner-friendly wood projects that you can build with simple tools and a little creativity.
Inside, you’ll find:
🪵 Step-by-step instructions for each project
🛠️ Easy-to-follow designs—perfect for beginners
🌿 Functional and stylish pieces you’ll actually use
🎉 Projects you can complete in just a weekend
Whether you want to craft a garden bench, a planter box, or a simple home décor piece, this guide will help you turn raw wood into something beautiful and useful.
👉 Enter your email below to claim your FREE copy and start your DIY journey today!
Please log in to access your exclusive content.
Don’t have an account? Click the “Register” button below to sign up.
Related Posts